
6-Inch DA Random Orbital Sander: 850W Power + 10 Discs
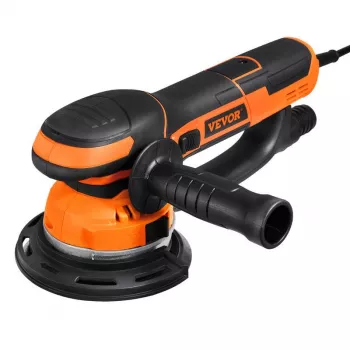
6-Inch Dual Action Random Orbital Sander with 850W Motor & 10 Sandpapers
A 6-inch dual action random orbital sander is designed to level surfaces quickly while keeping visible sanding patterns under control. With a high-power motor and a starter set of sanding discs, it fits common shop tasks like furniture refinishing, paint prep, and smoothing wood filler—especially when paired with the right grit progression and solid dust-management habits.
What a Dual Action Random Orbital Sander Does Best
Dual action (DA) random orbital sanding combines rotation with an orbiting motion. That mixed movement helps break up repetitive scratch lines that can show up with straight-line sanding. The result is a more uniform surface that’s easier to stain, paint, or clear-coat without telegraphing obvious sanding marks.
- Combines rotation and orbit movement to reduce visible sanding patterns compared with straight-line sanding.
- Handles common prep work: removing light coatings, flattening minor unevenness, and blending edges before finishing.
- Works well on broad, flat panels (tabletops, doors, cabinet sides) and gentle curves with the right pad pressure.
- Pairs best with hook-and-loop 6-inch discs, making grit changes fast during multi-step sanding.
Key Features That Matter for Results
Random orbital sanders often look similar, but a few practical features determine how consistent your finish looks and how quickly you get there.
- Motor power: an 850W motor supports consistent sanding under load, helping maintain speed when leveling filler or smoothing hardwood.
- Pad size: a 6-inch pad covers more area per pass than smaller sanders, improving efficiency on larger panels.
- Dual action movement: helps minimize swirls, especially when finishing at finer grits.
- Ergonomics: a stable grip and balanced body help keep the pad flat, which improves uniformity and reduces gouging risk.
- Disc system: hook-and-loop discs allow quick grit changes, encouraging proper grit progression instead of forcing a single disc too long.
Specifications Snapshot
This 6-inch DA random orbital format lands in a practical sweet spot for workshop-level surface prep: large enough to move quickly on panels, while still controllable around edges and gentle curves. The included 10 sanding discs get you started right away, but most projects go smoother when you also stock up on the grits you reach for most often.
Quick Specs
| Feature | Detail |
|---|---|
| Sander type | Dual action random orbital |
| Pad size | 6-inch |
| Motor power | 850W |
| Included abrasives | 10 sandpapers (hook-and-loop) |
| Use cases | Wood prep, paint removal (light), refinishing, smoothing filler |
Choosing the Right Sandpaper Grit for the Job
Great results come from using the right grit at the right time. Coarse grits remove material fast but leave deeper scratches; fine grits refine the surface but can’t efficiently erase heavy scratch patterns. A steady, step-by-step progression is usually faster than “jumping” to a very fine disc too early.
- Coarse grits (40–80): faster removal for heavy paint, aggressive leveling, or flattening thick filler; higher risk of deep scratches that must be refined.
- Medium grits (100–150): general smoothing after coarse work; good for shaping transitions and preparing for final passes.
- Fine grits (180–220): pre-finish sanding for many wood projects; reduces visible scratches before stain or clear coat.
- Very fine grits (240–320+): between-coat sanding on finishes or ultra-smooth prep depending on the coating system.
- Rule of thumb: step through grits gradually; skipping too far increases time because the finer grit must remove deeper scratches.
Grit Progression Guide
| Task | Suggested grit steps | Notes |
|---|---|---|
| Leveling body filler / epoxy patches | 80 → 120 → 180 | Keep the pad flat; stop early if edges start thinning. |
| Stripping tired finish (light to moderate) | 80/100 → 150 → 220 | If finish gums up discs, switch to a fresh disc sooner. |
| Sanding bare wood before stain | 120 → 150 → 180 (sometimes 220) | On softwoods, avoid pressing hard at fine grits to prevent uneven density sanding. |
| Prep before paint | 120/150 → 180 → 220 | Aim for uniform scratch pattern so primer bonds evenly. |
| Between clear-coat layers | 240 → 320 | Use light pressure; focus on de-nibbing and flattening dust specks. |
Technique Tips for Smoother Surfaces and Fewer Swirls
Dust Control and Workshop Cleanup
- Use vacuum extraction or a dust bag when available to reduce airborne dust and extend disc life by limiting clogging.
- Empty collection containers frequently; fine dust reduces suction and can leak from overfilled bags.
- Wear a respirator rated for fine particulates when sanding wood, filler, or finishes—especially indoors. See OSHA’s overview on wood dust hazards: https://www.osha.gov/wood-dust.
- If you’re sanding older painted surfaces where lead is a possibility, follow EPA lead-safe guidance: https://www.epa.gov/lead.
Common Mistakes and Quick Fixes
Product Options In Stock
- 6-Inch Dual Action Random Orbital Sander with 850W Motor & 10 Sandpapers ($132.32)
- Full-Length Floor Mirror with Stand ($222.97)
- Artificial Boxwood Spiral Topiary Plant ($89.17)
- Twin Over Twin Bunk Bed with Slide and Ladder ($618.51)
FAQ
What grit should be used first on a painted surface?
Start with 80–120 for light-to-moderate paint removal, then move up to 150 and finish around 220 for a paint-ready surface. If the paint is thick or stubborn, begin closer to 80 and plan additional refinement steps.
How can swirl marks be prevented when using a random orbital sander?
Use light pressure, keep the pad flat, overlap your passes, and don’t skip grit steps. Replace the disc before it becomes dull or clogged, and finish with a light final pass at the last grit.
Can a 6-inch random orbital sander be used for sanding between coats of clear finish?
Yes—use a light touch with fine grits (typically 240–320) to remove dust nibs and improve adhesion. Keep the surface clean and avoid pressing hard to prevent unnecessary scratching.














Leave a comment